Print:排印风格 Typecho 主题
Print 是一款排印风格主题,适用于博客软件 Typecho 。该主题更适合写作类博客,也适合技术类博客。
关于这款主题的设计解释,感兴趣的话可以阅读我的文章《模仿——主题 Print 的幕后故事》。
枫茶舍
这里筱枫~
Print 是一款排印风格主题,适用于博客软件 Typecho 。该主题更适合写作类博客,也适合技术类博客。
关于这款主题的设计解释,感兴趣的话可以阅读我的文章《模仿——主题 Print 的幕后故事》。
#include<iostream>
using namespace std;
struct LinkNode{
    int data;
    LinkNode *link;
};
typedef LinkNode* NodePtr;

//头部插入
void Insert(NodePtr &head, int data){
    NodePtr temp = new LinkNode;
    temp -> link = head;
    temp -> data = data;
    head = temp;
}

//迭代输出
void Iter(NodePtr head){
    for(NodePtr here = head; here != 0; here = here -> link){
        cout << here -> data << endl;
    }
}

//搜索 data 返回指针
NodePtr Search(NodePtr head, int target){
    for(NodePtr here = head; here != 0; here = here -> link){
        if(here -> data == target){
            return here;
        }
    }
}

//后插入
void AfterInit(NodePtr head, int target, int value){
    NodePtr afterMe = Search(head, target);
    NodePtr newNode = new LinkNode;
    newNode -> link = afterMe -> link;
    newNode -> data = value;
    afterMe -> link = newNode;
}

//前插入
void BeforeInit(NodePtr head, int target, int value){
    NodePtr beforeMe = Search(head, target); //位于新元素之后
    NodePtr newNode = new LinkNode;
    newNode -> data = value;
    for(NodePtr here = head; here != 0; here = here -> link){
        if(here -> link == beforeMe){
            //此时的 here 就是新元素之前的元素
            here -> link = newNode;
            newNode -> link = beforeMe;
            break;
        }
    }
}

int main(){
    NodePtr head;
    head = new LinkNode;
    head -> data = 13;
    head -> link = 0;
    cout << head -> data << endl << "---" << endl;
    Insert(head, 11);
    Insert(head, 10);
    Insert(head, 9);
    Insert(head, 8);
    Iter(head);
    cout << "---" << endl;
    BeforeInit(head, 13, 12);
    Iter(head);
    return 0;
}使用 Composer 下载所需的准备材料。
cd ... #网站根目录
composer require firebase/php-jwt
在 PHP 文件中,需要写入下面的代码,注意目录路径,这里是相对于根目录。
require __DIR__ . '/vendor/autoload.php';
use Firebase\JWT\JWT;我们使用 Cookie 储存 JWT。
我们需要创建一个自定义字符串作密钥,这里我们存在一个名为key-999d-45a2-a2b3.php的文件中:
<?php
    $key = 'cptbtptp233';
?>
核心部分代码:
// $audience 是用户名。
// $exp 是失效时间,这里设为 1 天。

require 'key-999d-45a2-a2b3.php';
$exp = time() + 24 * 60 * 60;

$payload = array(
"aud" => $audience,
"exp" => $exp
);

$jwt = JWT::encode($payload, $key);
setcookie("token",$jwt,$exp);
值得注意的是,firebase/php-jwt 支持多种不同的算法,在JWT::encode()第三个参数省缺的情况下默认为 HS256 。可以在 https://jwt.io/#libraries-io 查看。若要使用其他算法,例如 HS512 ,需要上述代码将倒数第二行更为:
$jwt = JWT::encode($payload, $key, 'HS512');创建好后我们就可以根据令牌校验。
require 'key-999d-45a2-a2b3.php';
if(isset($_COOKIE['token'])){
    //如果 COOKIE 存在
    $jwt = $_COOKIE['token'];
    try{
        $decoded = JWT::decode($jwt, $key, array('HS256'));
        $uid = $decoded -> aud; //用户ID
        $exp = $decoded -> exp; //JWT有效期

        if(time() < $exp) $ifLogin = true; //JWT也没过期,通过校验
    } catch(Exception $e){
            //如果JWT被篡改
            echo '你这 JWT 有问题啊:'.$e->getMessage();
    }
}
至此完成。
应在不瞒报的前提下使用自动化健康打卡程序。
您应当知晓使用自动化程序可能造成学校处分等后果。
抓包流程
使用软件 Fiddler 4 进行抓包。
前期具体步骤:
Android 用户可参考:使用fiddler实现手机抓包 - 简书
iOS 用户可参考:fiddler抓苹果手机上app包的方法... - CSDN
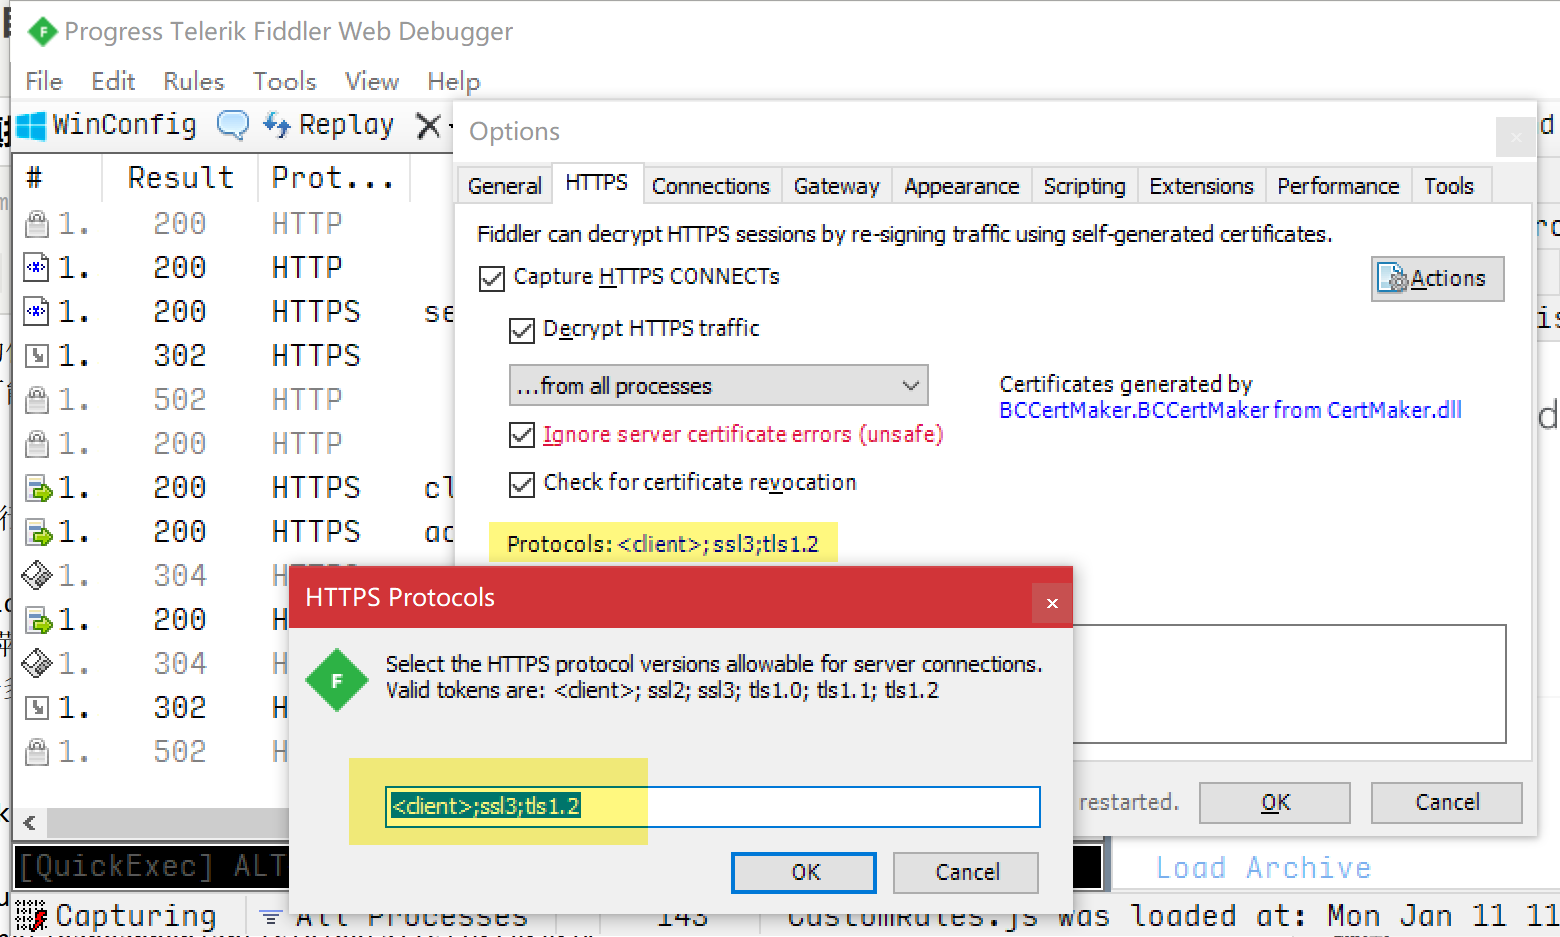
值得注意的是,许多浏览器已不支持 TLS1.0/1.1,因此需要手动在 Tools - Options - HTTPS 中修改 Protocols 为
<client>;ssl3;tls1.2

HTTPS-ver.png
配置好后,试着进行打卡,发现向服务器传送了数据。
POST https: //▇▇▇.▇▇▇.edu.cn/v1/temperatures/ HTTP/1.1
Host: ▇▇▇.▇▇▇.edu.cn
Content-Type: application/json; charset=utf-8
Accept-Language: zh-cn
Accept-Encoding: gzip, deflate, br
Connection: keep-alive
Accept: application/json
User-Agent: ▇▇▇
Authorization: JWT ▇▇▇▇
Referer: https: //servicewechat.com/▇▇▇/▇▇/▇▇▇.html
Content-Length: 234

{
    "value": "36",
    "condition": "A",
    "home_condition": "A",
    "watched": false,
    "watched_location": "",
    "stayed": false,
    "stayed_contacted": false,
    "family_conditions": "",
    "is_contacted": false,
    "contacted_health": "",
    "personid": "",
    "notes": "",
    "location": {}
}
我们可以看到,关键的信息是 Header 中的 Authorization 和 JSON。
JSON 当中是填报的表单,其中 value 是体温值(摄氏度)。
试着退出打卡系统重新登录,发现向服务器传送数据如下。
POST https://▇▇▇.▇▇▇.edu.cn/▇▇▇/▇▇▇/login/ HTTP/1.1
Host: ▇▇▇.▇▇▇.edu.cn
Content-Type: application/json; charset=utf-8
Accept-Encoding: gzip, deflate, br
Connection: keep-alive
Accept: application/json
User-Agent: ▇▇▇
Referer: https://servicewechat.com/▇▇▇/▇▇/▇▇▇.html
Content-Length: 59
Accept-Language: zh-cn

{"username":"▇▇▇▇▇▇","password":"▇▇▇▇▇▇","type":""}
其中 username 和 password 均为明文,不需要做改动。
响应后返回的 JSON 为
{
    "token": "▇▇▇",
    "token_expiration_datetime": "2021-07-09 21:12:38"
}
这里的 token 加上前缀 JWT 即为上文中 header 内的 Authorization 的值。
至此,抓包部分结束。
由于之前没有学过 Python ,但是觉得 Python 应该可以简单实现并在服务器上部署,决定用 Python 试一试。
在网上查阅资料后,相关设计步骤如下。
需要引用 requests 和 json 包,用于发送 POST 请求和解析 JSON 数据。
程序如下。
import requests
import json
url = 'https://▇▇▇.▇▇▇.edu.cn/v1/temperatures/'
datas = {
    "value": "36",
    "condition": "A",
    "home_condition": "A",
    "watched": 0,
    "watched_location": "",
    "stayed": 0,
    "stayed_contacted": 0,
    "family_conditions": "",
    "is_contacted": 0,
    "contacted_health": "",
    "personid": "",
    "notes": "",
    "location": {}
}
headers={"Authorization": "JWT ▇▇▇"}
morning =requests.post(url,data=datas,headers=headers)
print(morning)
print(morning.text)
也可以设计成填入账号密码就可以自动获取 token 打卡的形式。
import requests
import json
url_morning = 'https://▇▇▇.▇▇▇.edu.cn/v1/temperatures/'
url_login = 'https://▇▇▇.▇▇▇.edu.cn/▇▇▇/▇▇▇/login/'

#下文中的学号和密码自行修改
datas_login = {"username":"▇▇▇▇▇▇","password":"▇▇▇▇▇▇","type":""}

datas_morning = {
    "value": "36",
    "condition": "A",
    "home_condition": "A",
    "watched": 0,
    "watched_location": "",
    "stayed": 0,
    "stayed_contacted": 0,
    "family_conditions": "",
    "is_contacted": 0,
    "contacted_health": "",
    "personid": "",
    "notes": "",
    "location": {}
}
login = requests.post(url_login,data=datas_login)
print("登录状态",login)
dic = json.loads(login.text)
token = "JWT "+dic['token']
headers={"Authorization": token}
morning = requests.post(url_morning,data=datas_morning,headers=headers)
print("---------------------")
print("晨报状态",morning)
print("晨报返回值",morning.text)
对于服务器,可以配置好 Python 后设置定时任务。注意安装对应的包。
个人电脑来讲,每天手动运行或者用其他方法令其自动运行即可。
代码参考:windows .bat批处理实现进程监控确保程序运行 - 百度经验
可以自动检测某程序是否运行并予以打击制裁。
@echo off

rem 下面的AppName是进程名字,AppPath是路径,修改等号后面的内容就行

set AppName=swap.exe

set AppPath=D:\code\cpp

title 进程监控

cls

echo.

echo 进程监控开始……

echo.

:startjc

   rem 从进程列表中查找指定进程

   rem  下面语句也可写成 qprocess %AppName% >nul (经验发布后补充)

   qprocess|findstr /i %AppName% >nul

   rem 变量errorlevel的值等于0表示查找到进程,否则没有查找到进程

   if %errorlevel%==0 (

         echo ^>%date:~0,10% %time:~0,8% 发现进程,正在制裁

         taskkill /f /im %AppName%

         exit

    )else (

           echo ^>%date:~0,10% %time:~0,8% 没有发现程序进程
    )

   rem 用ping命令来实现延时运行,下方(1,1,4)中的4可以修改为想要的秒数

   for /l %%i in (1,1,4) do ping -n 1 -w 1000 168.20.0.1>nul

   goto startjc

echo on
项目地址 https://github.com/Hsiao-Feng/Chinese-Era
关于公元前以及三位数年份此方法是否适用尚未考证,似乎有误,不推荐进行此类的推算。如需尝试公元前年份输入负数即可。
这是我在 2017 年编写的一个小程序,用于公历纪年法对中国传统天干地支纪年法的转换。